Canvas/linen supports from a shop can be quite expensive and of dubious quality, and what if you want to make a painting of different dimensions to what’s available on the shelf? With a little bit of effort and some basic tools, you can learn to make stretchers yourself! Here is how I learned to make them on the painting course at Wimbledon College of Art (London).
It’s a bit long-winded the first time, but hang in there, you’ll end up with a stretcher that will last for many years – and if you don’t like the painting, rip it off the stretcher and re-use it until you’re satisfied!
The stuff you need to get started
WOOD
- (6) 1 x 2 [or 1 x 3] planks of wood, cut to an inch or two LARGER than you want your final painting to be; usually pine or other softwood
- Select planks that have no warps or bends, and avoid pieces with large knots on the spot where you’ll be cutting.
- 4 strips of 21mm quadrant trim/beading – again an inch or two LARGER than the dimensions of your final painting, just in case


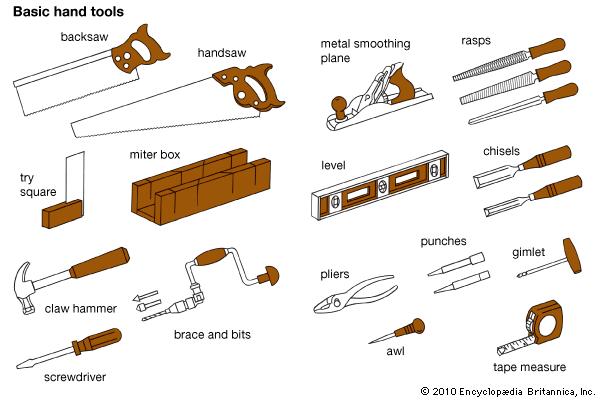
TOOLS
- pencil
- tape measure
- carpenter’s square
- Hammer
- Screw driver (and screws)
- corner clamps (4)
- chisel and mallet
- miter box and hand saw
- Wood glue
- sand paper/sanding block
And if you have access to a work shop, then a band saw, a belt sander and a 45* corner “gnawing” machine are useful, too, making this whole process much quicker and efficient.
CANVAS or LINEN
- A piece of CANVAS (10 or 12 pound) or LINEN 3-4 inches LARGER than you want your painting to be
- Staple gun and staples (10-12 mm)
- Canvas pliers
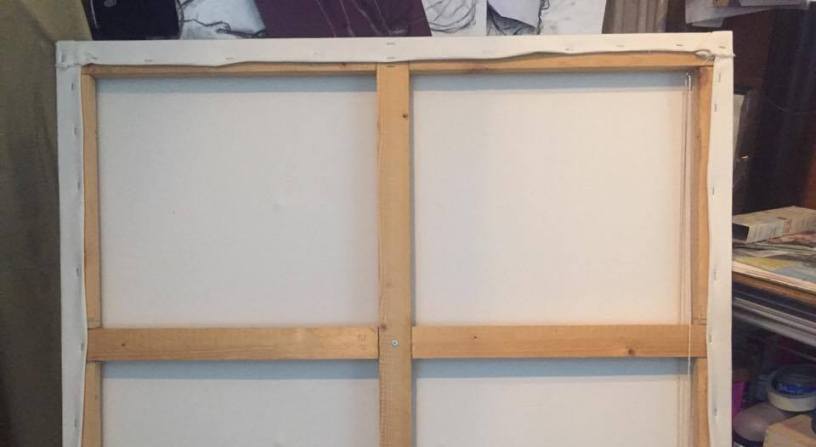
Build the Stretcher frame
- Measure and cut your wood planks in pairs to the approximate dimensions of the stretcher you want in the end
- EXAMPLE – if you want a 60 cm x 90 cm painting, then cut a pair of pieces about 65 cm and a pair of pieces about 95 cm each PLUS another 65 cm piece and/or another 95 piece to make the supporting cross-bar(s).
- For a canvas with four sides, what are the extra pieces for? You’ll have a left, a right, a top, and a bottom – plus one (or two) cross-bar(s) for extra support/strength.
- Lay the pieces out and mark each piece with Top, Bottom, Left, Right, Crossbar(s) (so you don’t get confused)
- Putting the cross-bars aside for now, measure, adjust the layout of pieces as necessary and mark on each plank where the correct length should be and also where the lap joints will be
- Starting with a side, say the Bottom, mark the lap joints for the bottom Left and bottom Right.
- For each lap joint, saw halfway through the plank and use a mallet and chisel to knock out the waste.
 Making a canvas stretcher frame, side lap joint. Photo credit Kelise Franclemont.
 Making a canvas stretcher frame, corner lap joint. Photo credit Kelise Franclemont.
 - Repeat for remaining sides of the stretcher.
- Layout the four sides and fit them together using corner clamps, and measure to confirm the stretcher is the size you’re after.

Making a canvas stretcher frame, aligning corner lap joint with frame clamps. Photo credit Kelise Franclemont. - Now lay a crossbar across the centre of the stretcher and mark the lap joints on the Left and Right side bars. Again, for each lap joint, saw halfway through the plank and use a mallet and chisel to knock out the waste.
- Layout the four sides, plus the cross bar you just made and fit them all together with corner clamps, measure to confirm the stretcher is the size you’re after.
- (**If you’re doing two crossbars) Now lay the final crossbar across the centre of the stretcher and mark the lap joints on the Top and Bottom side bars, and the first crossbar. Again, for each lap joint, saw halfway through the plank and use a mallet and chisel to knock out the waste.
- Layout the four sides, plus the one (or two) cross bar(s) you just made and fit everything all together with corner clamps.
- Starting with the outer frame (Top, Bottom, Left, and Right), line everything up with four corner clamps, drill two pilot holes in each lap joint, apply wood glue to each joint, and screw the lap joints together.
- Fit the cross bar(s) onto the stretcher frame, drill two pilot holes in each lap joint, apply wood glue to each joint, and screw the lap joints together – EXCEPT for the centre lap joint, do NOT apply glue and drill in the centre screws LAST. (This allows for adjustments later).

Making a canvas stretcher frame, cross-bar lap joint. Photo credit Kelise Franclemont. - Now flip the stretcher frame over with the front (canvas side) facing up.
- Working one side at a time, lay out and measure the quadrant beading/trim, marking the outer edge at the corners of the stretcher frame, and cut 45* angles INWARDS on both ends of the beading.
- Apply wood glue to the underside of the trim, and tack onto the stretcher frame.
- Sand all the corners, sides, and edges smooth.
- It’s advised to let glue dry overnight before stretching canvas/linen onto the frame.
Here’s a diagramme of how to put the frame together:

Stretch your canvas (or linen)
- Cut a piece of canvas about 3-4 inches larger than your frame

Stretching canvas, measuring to fit the frame. Image courtesy craftsy.com - Lay out the canvas flat with the rough side up (this will be the back of your canvas).
- Lay out the stretcher, back side UP (screws showing) in the approximate centre of your canvas, lining up the warp/weft with the edge of your stretcher frame as best you can.
- Working one side, then opposite side, roll/fold the canvas edge, pull fairly tight so there’s no slack, and tack into place with one staple in the centre of each side.
- Using canvas pliers, working one side, then opposite side, roll/fold the canvas edge, using the canvas pliers, with a gentle pull, then holding the canvas with one hand, release the pliers and staple the canvas.

Using canvas pliers. Image courtesy pinterest/jesseagay - Go around the canvas, working a side, then across on the opposite side, roll/fold the canvas, pull, staple, stopping about 4 inches from the corners, and leaving the corners til last.

Image courtesy http://www.carlagraceart.com - Fold in the corners (may have to trim some of the canvas first), and staple.
- Then roll/fold, pull, and staple in between corners and last staple you did on the sides.
You’re ready to size and/or prime your support!
MATERIALS
- Wide paintbrush (the larger the canvas, the wider brush you need)
- Size (for linen, but optional for cotton)
- Gesso (for both linen and cotton, applied after size dries/cures, if you’re using it)
Technique varies depending on what fabric you’re painting on (linen vs cotton) but basically, this image demonstrates the brush and technique:


Thank you so much for this – I’d forgotten the method after graduating from Wimbledon a very long time ago, really great to find this on your blog!
Thanks ffor writing